I’ll be demonstrating how to use Ionic Web Components in a Blazor Web-Assembly App. This demo is built on top of the basic Blazor WASM project template available in Visual Studio.
1. Import Ionic Web Components’s Library into your Blazor App 🔗
Go to wwwroot\index.html and add the following to the <head> tag
1
2
3
4
|
<!--index.html-->
<script type="module" src="https://cdn.jsdelivr.net/npm/@ionic/core/dist/ionic/ionic.esm.js"></script>
<script nomodule src="https://cdn.jsdelivr.net/npm/@ionic/core/dist/ionic/ionic.js"></script>
<link rel="stylesheet" href="https://cdn.jsdelivr.net/npm/@ionic/core/css/ionic.bundle.css"/>`
|
We also need to change the starting point tag from <app> to <ion-app>
1
2
|
<!--index.html-->
<ion-app>Loading...</ion-app>
|
and tell Blazor our new starting point tag in Program.cs
1
2
|
//Program.cs
builder.RootComponents.Add<App>("ion-app");
|
2. Creating a new page 🔗
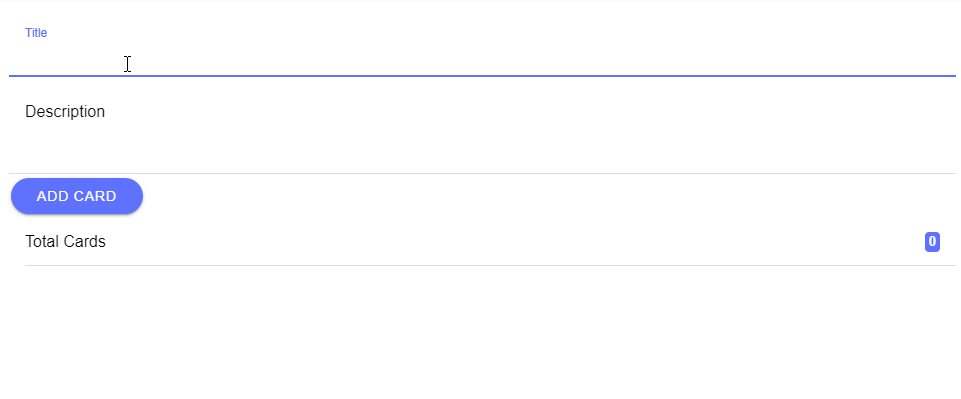
Our page is going to let users add new items to a card. We will be using Ionic’s ion-input, ion-textarea, ion-card and ion-card-content web components. If the same title is being added more than once we will be displaying a popup message using ion-alert
A note about data binding and web components 🔗
Blazor doesn’t understand @bind="Property" on a non-html input element and since we are binding to an ion-input we need to use a combination of value/event: @bind-value="@Property" @bind-value:event="oninput". This combination of value/event is actually what @bind does behind the scenes.
2.1 Model 🔗
This is our model that is going to hold the page values
1
2
3
4
5
|
public class Card
{
    public string Title { get; set; }
    public string Content { get; set; }
}
|
2.2 Page 🔗
Create a new page under Pages called CardPage.razor and add the following.
 1
 2
 3
 4
 5
 6
 7
 8
 9
10
11
12
13
14
15
16
17
18
19
20
21
22
23
24
25
26
27
28
29
30
31
32
33
34
35
36
37
38
39
40
41
42
43
44
45
46
47
48
49
50
51
52
53
54
55
56
57
58
59
60
61
62
63
64
65
66
67
68
69
70
71
72
73
|
@* CardPage.razor *@
@inject IJSRuntime JSRuntime
@page "/card"
<div class="ion-page" id="main-content">
<ion-header>
<ion-toolbar>
<ion-buttons slot="start">
<ion-menu-button></ion-menu-button>
</ion-buttons>
<ion-title>Cards</ion-title>
</ion-toolbar>
</ion-header>
<ion-content class="ion-padding">
<ion-item>
<ion-label position="floating">Title</ion-label>
@* Binding to Title *@
<ion-input @bind-value="@Title" @bind-value:event="oninput"></ion-input>
</ion-item>
<ion-item>
<ion-label position="floating">Description</ion-label>
@* Binding to Content *@
<ion-textarea @bind-value="@Content" @bind-value:event="oninput"></ion-textarea>
</ion-item>
<ion-button color="primary" @onclick="AddCard" shape="round">Add Card</ion-button>
<div>
<ion-item>
<ion-label>Total Cards</ion-label>
@* Showing total number of cards *@
<ion-badge slot="end">@cards.Count</ion-badge>
</ion-item>
@foreach (var card in cards)
{
<ion-card>
<ion-card-header>
<ion-card-title>@card.Title</ion-card-title>
</ion-card-header>
<ion-card-content>
@card.Content
</ion-card-content>
</ion-card>
}
</div>
</ion-content>
</div>
@code {
private List<Card> cards = new List<Card>();
private string Title;
private string Content;
private async Task AddCard()
{
if (!string.IsNullOrEmpty(Title))
{
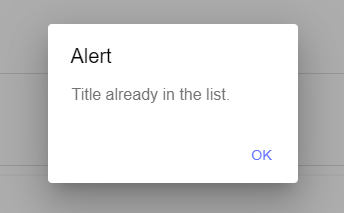
if (cards.Any(x => x.Title == Title))
{
@* If Title already exists, show a message *@
await JSRuntime.InvokeVoidAsync("showIonAlert");
return;
}
cards.Add(new Card { Title = Title, Content = Content });
Title = string.Empty;
Content = string.Empty;
}
}
}
|
2.3 Showing a message using ion-message 🔗
We need to use blazor javascript interop in order to display a popup message using ion-alert.
Go to index.html and add the folloing script to the <head> tag under a <script type="text/javascript"> tag
1
2
3
4
5
6
7
8
9
|
window.showIonAlert = () => {
    const alert = document.createElement('ion-alert');
    alert.header = 'Alert';
    alert.message = 'Title already in the list.';
    alert.buttons = ['OK'];

    document.body.appendChild(alert);
    return alert.present();
}
|
and then we can call this js function from Blazor await JSRuntime.InvokeVoidAsync("showIonAlert");
 1
 2
 3
 4
 5
 6
 7
 8
 9
10
11
12
13
14
15
16
17
18
19
20
21
|
@code {
    private List<Card> cards = new List<Card>();
    private string Title;
    private string Content;


    private async Task AddCard()
    {
        if (!string.IsNullOrEmpty(Title))
        {
            if (cards.Any(x => x.Title == Title))
            {
                @* If Title already exists, show a message *@
                await JSRuntime.InvokeVoidAsync("showIonAlert");
                return;
            }
            cards.Add(new Card { Title = Title, Content = Content });
            Title = string.Empty;
            Content = string.Empty;
        }
    }
|
3. Adding navigation 🔗
We will be using ion-menu and blazor’s NavigationManager to provide navigation within our app. We will have just one menu item that is going to take the user to our brand new page.
Go to Shared\MainLayout.razor and replace everything with:
 1
 2
 3
 4
 5
 6
 7
 8
 9
10
11
12
13
14
15
16
17
18
19
20
21
22
23
24
25
26
27
28
29
30
31
|
@*//MainLayour.razor *@
@inherits LayoutComponentBase
@inject NavigationManager NavigationManager    @*// Pulling NavigationManager from the DI conteiner *@

<ion-menu side="start" content-id="main-content">
    <ion-header>
        <ion-toolbar translucent>
            <ion-title>Menu</ion-title>
        </ion-toolbar>
    </ion-header>
    <ion-content>
        <ion-list>
            @*// Handling onclick *@
            <ion-item @onclick="NavigateToComponent">
                <ion-icon name="add-circle-outline" slot="start"></ion-icon>
                <ion-label>Add Card</ion-label>
            </ion-item>
        </ion-list>
    </ion-content>
</ion-menu>

@*// Placeholder where all the pages will be rendered *@
@Body

@code {
    private void NavigateToComponent()
    {
        @*// Going to our new page *@
        NavigationManager.NavigateTo("counter");
    }
}
|
And there we go. We have a simple Blazor app using Ionic Web Components.